Quick answer: To compress images for the web without losing quality, resize the image to the size it is actually shown at, save it as WebP (or JPG for photos if WebP is not an option), and compress at a quality setting of about 75 to 85. Do these three things in that order and most images drop to a fraction of their original size with no visible difference.
Images are usually the heaviest part of a web page. A single photo straight from a phone or camera can be several megabytes, and a page with a handful of them loads slowly, especially on mobile data. Slow pages frustrate visitors and can hold back your search rankings. The good news is that images are also the easiest thing to fix.
This guide walks through the whole process in plain steps: why compression matters, the difference between lossy and lossless, the exact order to follow, and the mistakes that quietly slow sites down.
Why compressing images matters
Smaller images help in three practical ways:
- Faster loading. Less data to download means your page appears sooner, which visitors notice immediately.
- Better Core Web Vitals. On many pages the largest visible element is an image, so its size directly affects Largest Contentful Paint, one of the speed measures Google looks at.
- Lower data use and hosting load. Visitors on slow or limited connections get a smoother experience, and your server sends fewer bytes.
Lossy vs lossless compression: what is the difference?
Every compression method falls into one of two groups, and knowing which one you are using helps you protect quality.
Lossless compression
Lossless compression removes unnecessary data without changing a single pixel. The image looks identical, but the file only shrinks a little. PNG uses lossless compression, which is why it is good for logos, screenshots and graphics with sharp edges.
Lossy compression
Lossy compression permanently discards some detail that the human eye barely notices. This gives much smaller files. JPG is lossy, and WebP and AVIF can be lossy too. Used at a sensible quality level, the result looks the same to most people. Pushed too far, you start to see blocky patches and fuzzy edges.
For photos on a website, lossy compression at a moderate setting is almost always the right choice. For logos, icons and screenshots with text, lossless (or SVG for simple shapes) keeps edges crisp.
How to compress images for web: step by step
Step 1: Resize the image to the size you need
This is the biggest saving and the one most people skip. If your blog column shows images at 800 pixels wide, uploading a 4000 pixel wide photo wastes most of its data, because the browser shrinks it on screen anyway. As a rule of thumb, make the image about the width it is displayed at. If you want it to look sharp on high-density (retina) screens, up to twice that width is plenty.
You can do this with our free image resizer, and use the image cropper if you also need to trim the picture to a certain shape or ratio first.
Step 2: Choose the right format
Different formats suit different images. Picking the right one often saves more than adjusting any quality slider. Here is a simple guide:
| Format | Best for | Compression type |
|---|---|---|
| WebP | Almost everything on the web: photos and graphics | Lossy or lossless |
| JPG | Photos when you need the widest compatibility | Lossy |
| PNG | Logos, screenshots and images that need transparency | Lossless |
| AVIF | Photos where you want the smallest possible file | Lossy or lossless |
| SVG | Simple logos and icons that must stay sharp at any size | Vector (no pixels) |
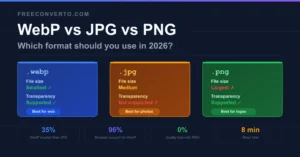
For most websites, WebP is the best everyday choice. It is widely supported by modern browsers and is often noticeably smaller than JPG at a similar look. If you want the full comparison, read our guide to WebP vs JPG vs PNG. To switch an existing image to a better format, use the free image converter.
Step 3: Compress with a sensible quality setting
Now run the image through a compressor. For photos, a quality setting of around 75 to 85 is a good starting point. Below about 60 most people begin to see flaws, and above about 90 you pay a lot in file size for very little visible gain.
Our free image compressor runs in your browser, so your pictures stay on your own device. Upload the image, adjust the quality, and compare the result before you download it.
Step 4: Compare before and after
Always look at the compressed image next to the original, zoomed in on the areas with the most detail, such as faces, text and sharp edges. If you cannot tell the difference, the setting is fine. If you can, raise the quality a little and try again. This takes a few seconds and prevents over-compressing.
Step 5: Add the image to your page the right way
Good files can still be slowed down by how they are placed on the page. Keep these habits:
- Set width and height on images so the page does not jump around while they load.
- Lazy-load images below the fold so they only download when a visitor scrolls to them. WordPress does this for most images automatically.
- Do not lazy-load the main image at the top of the page. It should load right away, because it is usually the largest element on screen.
- Write clear file names and alt text such as
compress-images-for-web.webpinstead ofIMG_4821.jpg. This helps accessibility and image search.
How big should a web image be?
There is no single perfect number, because it depends on the picture. These are rough targets that work well for most sites:
| Image type | Rough target size |
|---|---|
| Full-width hero or banner image | Under about 200 KB |
| Image inside a blog post | Under about 100 KB |
| Thumbnail or card image | Under about 30 KB |
| Logo or icon | A few KB (use SVG where possible) |
Treat these as a guide, not a rule. A detailed landscape photo may need a little more, and a simple graphic will need far less.
Common image compression mistakes to avoid
- Compressing an already compressed JPG again and again. Each lossy save removes a little more detail. Always compress from the original when you can.
- Skipping the resize. Compressing a huge image still leaves a huge file. Resize first.
- Using PNG for photos. PNG files of photographs are very large. Use WebP or JPG instead.
- Setting quality too low. Saving a few extra kilobytes is not worth visible blocks and blurry edges.
- Forgetting mobile. Most visitors browse on phones, so check how your images look and load on a small screen.
Free tools to compress and prepare your images
You can handle the whole workflow with free, browser-based tools that need no sign-up:
- Image resizer: set exact dimensions before compressing.
- Image cropper: trim to the right shape or ratio.
- Image converter: switch between JPG, PNG, WebP, AVIF and more.
- Image compressor: reduce file size and compare the result.
Frequently asked questions
Can I compress an image without losing any quality?
Yes, with lossless compression, but the file will only get a little smaller. For a big reduction you need lossy compression. At a moderate quality setting the difference is usually invisible to the eye, so the result looks the same while the file is far smaller.
What is the best format for web images?
For most websites, WebP is the best all-round choice because it handles photos and graphics well at small file sizes. Use JPG when you need the widest compatibility, PNG for logos and screenshots that need sharp edges or transparency, and SVG for simple vector logos and icons.
What quality setting should I use for JPG or WebP?
A setting of about 75 to 85 works well for most photos. Compare the result with the original, and raise the quality slightly only if you can see a difference.
Does image compression help SEO?
Indirectly, yes. Smaller images make pages load faster, which improves the visitor experience and can help your page speed scores. Clear file names and descriptive alt text also help search engines understand your images.
Are my images uploaded when I use an online compressor?
That depends on the tool. FreeConverto’s image tools work in your browser, so your images stay on your device. For any other tool, check its privacy policy before uploading private pictures.
Ready to speed up your images?
Resize, convert and compress your pictures in seconds. Free, no sign-up and no watermark.Compress ImagesConvert ImagesResize Images